Layout Design With Xtrkcad
Rail3D aims to simulate the operation of real railways as accurately as reasonably possible, and is thus not the ideal tool for planning model railways, as discussed on Rail3dH0. If you are interested in model railways, it is possible with a bit of fiddling to build layouts using the constraints of fixed geometry track. However, if you really want to do this, it is a lot easier to take advantage of the tools that already exist for model railway layout design.
What is this good for?
There are two main reasons for going to all this trouble:
- To allow you to use Rail3D for visualising and testing model railway layouts before you get out the flexitrack and the junior hacksaw.
- To lay track within precise constraints of curve radius, gradient, turnout design, etc.
Limitations
- Unless you’re very good at multiplying and dividing by 86 (or 160, as the case may be), moving backwards and forwards between model scale and 1:1 can create problems
- Most commercial track systems have overscale track-spacing and excessively tight radii — if you’re concerned to meet real-life tracklaying rules you might have to stick to finescale track or design your own turnout set (I’m still trying to work out how to get xtrkCad to work in 1:1 scale)
- As discussed below, transferring elevation data from xtrkCad to Rail3D is non-trivial.
- Bear in mind that space is essentially free in Rail3D, while a model-style high track density can be a killer for framerate.
- The best approach might well be to use xtrkCad for designing station modules that can be merged into a Rail3D layout designed using the Digitiser tool in the usual way.
xtrkCad
xtrkCad is a layout planning tool originally marketed as a Windows 3.1 shareware application by Sillub Technology. Since 2005 it has been freely available for personal use, and is being developed as open source software.
The program offers all the usual possibilities for designing layouts using commercially available set track pieces and/or flexible track. What is particularly interesting for us is that the layouts are stored in an open text-based format that is fairly easily convertible into Rail3D nodes and links. You could do this with a spreadsheet, or you could download a little utility called Rail3dXTraktor (well, I wouldn’t have bothered to write it if it hadn’t offered the possibility of such a good name…).
How to xtrakt
Design your layout
The first step, obviously, is to design your layout in xtrkCad. For testing, I used a layout from a 1970s Märklin track plan book. The Märklin M-Gleis H0 track elements are available as a parameter file for xtrkCad.

Fixed track layout in
xtrkCad
xtrkCad comes with extensive documentation, so there’s no need to explain here how to use it. There are a few extra things you need to be aware of when designing for export to Rail3D:
- the Xtraktor will convert everything that it recognises as a track section or a text label, and ignore everything else. If you have any track in the layout that you don’t want to import put it in a hidden layer before saving the layout file.
- If you’re not too concerned about total realism, you can reduce the number of nodes and hence improve the performance of the layout in Rail3D by replacing long chains of straight track sections by a single straight laid using the straight track tool (Ctrl+G).
- Conversely, if you use the curve, circle or helix tool to build long curves, break them up into sections no bigger than 45 degrees, otherwise they will appear distorted in Rail3D (a Bezier curve only approximates to an arc over a fairly small range of angles).
- You will have problems if you try to use a helix of 360 degrees or more in Rail3D, because you can’t have more than one node at a given x,y position. Try to insert intermediate points or deform the helix a bit so that you don’t end up with the nodes exactly coincident.
- At present, the import of elevation data is a bit rudimentary. I would recommend that you use a different layer in your xtrkCad layout for each elevation in your layout (e.g. if the hidden sidings are 20 cm below the main baseboard and the branch terminus is 20 cm above the main board, use one layer for z = −20cm, one for z = 0 and one for z = 20cm).
Save your layout. This will result in a text file with the extension .xtc. You can open this file in any text editor, although it isn’t necessarily a good idea to start modifying it by hand.
Aside: the xtrkCad data format
Here are the first few lines of the file for the layout above:
#XTrkCad Version: 4.0.0, Date: Sun Jan 28 10:04:00 2007

VERSION 10 3.0.0
TITLE1 Märklin
TITLE2 Anlage 10
MAPSCALE 64
ROOMSIZE 72.8 x 51.2
SCALE HO
LAYERS 0 1 0 1 255 0 0 0 0 "Main"
LAYERS CURRENT 0
TURNOUT  1 0 0 0 0 HO 2 16.633858 3.149606 0 0.000000 "Märklin M-Track	Straight 180mm	5106"
	T 2 16.633858 3.149606 270.000000
	T 75 23.720472 3.149606 90.000000
	D 0.000000 0.000000
	P "Normal" 1
	S 0 0.000000 0.000000 0.000000 7.086614 0.000000
	L3 16754688 0.053333 0.000000 -0.738189 0 7.086614 -0.738189 0
	L3 16754688 0.053333 0.000000 0.738189 0 7.086614 0.738189 0
	END
- The
scale statement in this simple case just tells us the layout is in H0. This is used by Rail3dXTraktor to decide how much to scale the layout up. If you are using a strange scale, you might have to correct this in Rail3D using the Shift Layout command.
- The
turnout … end structure (despite its name) is used for all fixed track elements.
- The
T and E lines specify the end points of the track section — nodes, in Rail3D terms
- X and Y dimensions, e.g.
16.633858 are in scale inches from the layout origin. Rail3dXTraktor converts these to metres and scales them up to real world values.
 e.g. 16.633858 * 0.0254 = 0.4224999932 scale m
      0.4224999932 * 87.1 = 36.79974940772 real world m
-
- This example doesn’t show any elevation information — when present this is also in inches. A difficulty in converting the file is that xtrkCad calculates elevations dynamically, so elevation data is present in the file only for “defined” end points (which serve a similar purpose to locked nodes in Rail3D).
- The
P line specifies the paths through the element (trivial in this case: I haven’t fully worked out how it is used for slips and the like.
- The rest is just drawing information used internally in xtrkCad.
- Other elements, e.g.
straight, curve, joint work in much the same way.
Using Rail3dXTraktor
Open the layout file in Rail3dXTraktor, or copy the text you want to import to the clipboard and paste it into the top box in Rail3dXTraktor. Press the Convert button. You will be asked to confirm the scale you are working in, and the Rail3D text corresponding to your layout will appear in the lower box. You can then copy this in turn to the clipboard and paste it into Rail3D (Edit|Paste or Ctrl+V).
- The Rail3dXTraktor adds 20km on to the X and Y values to shift the layout’s sw corner from (0,0) to the default home position in Rail3D. You can change this by altering the values in the “Offset” boxes before converting. You can also add a Z offset, if necessary.
- Elevation data will be included, but only from points with elevation set to “defined” or “hidden”. To help you to identify these when you grade the layout, the “defined” nodes are marked with a text label for you.
- By default, the Rail3dXTraktor only imports the layers that were visible when you saved the file. This allows you to import the layout in stages, e.g. if you want to assign a different track type, or you want to add a Z-offset to some layers. If you want to import everything, check Import Hidden Layers.
- Make sure that you have set up the correct track type, Autocutting parameters, OHLE, etc. in the track options dialogue of Rail3D before pasting in the import text.
Finish off in Rail3D
As usual, there are still things you need to tidy up, and all the usual layout features (signals, trains, scenery, terrain, etc.) to add before you have a fully working layout.
One problem you are likely to encounter is the flipped node.
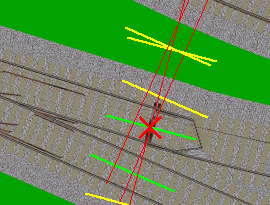
flipped node
This occurs when, for some reason, Rail3D attaches two links to the same side of a node instead of one to each side. It is very easy to fix — in most cases you can just delete and redraw the link. Take care not to delete the node! If the node still flips the link, try using Smooth Node from the context menu.
To grade the layout, lock the elevation of the nodes marked as “defined elevation” and run Grade Between Markers in the usual way
Completed layout
Resources
MRG 26/06/2013 13:39:38