Building Rail3D Models In3D Canvas
1 3DCanvas
3DCanvas is a popular, relatively inexpensive 3D modelling program. It seems to be one of the most popular tools for creating content for other simulators like msts, so there is a lot of rail-related 3DCanvas expertise available for us to build on. The program even comes with handy third-party tools for things like building steam locomotive wheels. What is really interesting for us is that it has an open programming interface which makes it easy to write export and import plugins for external file formats. The program is now (since December 2007) supplied with export plugins for most popular rail simulators, including Rail3D.
A word of warning: to use plugins you have to have a licensed version of 3DCanvas Pro, which costs (2008) us$ 70. The freeware version will allow you to build models and save them in 3DCanvas native format, but not to do anything else with them.
2 Rail3D Import plugin
The import plugin is used to transfer (parts of) a model created in the Rail3D modelling language into 3DCanvas for further editing.
It has to do a more complicated job than the export plugin, given the fluidity of Rail3D modelling language syntax. For the moment it is mainly useful for importing existing model shapes into 3DCanvas in order to optimise them, reskin them with new textures, and export them back to Rail3D in indexed triangle format.
Note that you may well have to do a fair amount of tweaking to the original model to get useful results with the plugin.
The plugin works differently depending on which version of 3DCanvas you are using.
2.1 Importer for 3dCanvas 7.1.1.2
Download the plugin here:
- for 3dCanvas 7.1.1.2 Attach:ImportRail3d_3dc_7_1_1_2.zip (Link no longer available) (02.03.2008)
This version will import multiple named components and attempt to place them in the correct relation to each other in the 3DCanvas model.
- Install by putting the dll in the Amabilis\Plugins directory, as with the exporter
- Run the importer from the Tools>Plugins>Trainworks menu in Canvas
- paste the Rail3D model text, including all the components you want to import, into the edit box. Make sure you include the
Name statements, otherwise the component will be given a default name, and the import of hierarchies will not work.
- the plugin will use the units specified in the model — if you are not importing a complete component, you can set units manually with the radio buttons.
- press the “Import” button.
- Component hierarchy:
- You will be asked for confirmation before any top-level components are imported. Sub-components are imported automatically.
- The new model is created as a child of the currently active group, or of the root group if nothing is selected.
- Each Rail3D component is imported as a new Canvas group containing an object with faces corresponding to the panels in the text.
- If the component is not found in the import text, the importer creates an empty group for it. You can do a separate import into this group later, if you want.
- Components included using the “!” operator are rotated about the Y axis — you may have to do a “normalise groups” before exporting again
- If the same subcomponent is referenced several times in the model, the importer creates a new copy of it each time. This looks nice, but isn’t really efficient.
- What it can and can’t import:
- The importer only supports Fill panels and Strips. It will ignore comments, scripts, vertex buffers, etc.
- Colour, texture, and U,V information are imported and displayed in 3DCanvas.
- Dot-colours are not supported
- Star-materials (
*glass, *tintedglass, *headlight, etc.) are imported with appropriate Ambient or Translucency settings. You may want to split these off into separate groups after import (tip: use Ctrl-alt-click with the face selection tool).
2.2 Importer for 3DCanvas 7.0 and before
Download the plugin here:
(Links no longer available)
- for 3dCanvas 7.0 Attach:ImportRail3d_3dc_7_0.zip (16.01.2007)
- for 3dCanvas 6.6.5 Attach:ImportRail3d_3dc_665.zip (bugfix, 19.12.2006)
- for 3dCanvas 6.6.1 Attach:ImportRail3d_3dc6_6.zip
- for 3dCanvas 6.5 ImportRail3d.zip
This version only imports one component at a time.
- Install by putting the dll in the Amabilis\Plugins directory, as with the exporter
- Run the importer from the Tools>Plugins menu in Canvas
- paste some text, including the Strip and Fill panels you want to import, into the edit box
- select the units used in the Rail3D model (the model is converted to metres when it is imported)
- press the “Import” button. You will be asked to supply a name for the object you are creating.
- Each Import operation creates a new Canvas group containing an object with faces corresponding to the panels in the text — do a series of separate imports for things you want to keep apart (merging objects is easier than separating groups of faces, later on).
- The new group is created as a child of the currently active group, or of the root group if nothing is selected.
- The importer only supports Fill panels and Strips. It will ignore any text that is not one of these.
- Colour, texture, and U,V information are imported and displayed in 3DCanvas.
- Bear in mind that colours can not be exported back to Rail3D — if you have a model with a limited number of colours you could make a simple colour-array texture, and use it to paint all the faces of the same colour. (Tip: Alt-Ctrl clicking with the face selection tool in 3DCanvas selects faces with the same colour)
- Before importing, add one texture from the directory where the textures for the model are stored to your Canvas materials panel. That way Canvas will look in the right directory for the new texture names.
- Remember that only one texture can be used per component in the model exported to Rail3D. You may need to make a composite texture and remap it onto your model if the original model used several small textures (use the Colour And Texture Remapping Tool to prepare your model if necessary).
- Single-sided panels with “$” or “-“ are oriented correctly, as are double-sided panels, but I haven’t got the autofacing routine quite right: panels with no orientation qualifier may sometimes be the wrong way round (Rail3D doesn’t always get it right either…).
- For some models it may be easier to fix the panel orientation in the Rail3D Editor before importing.
- The Rail3D Editor sometimes loses linefeed characters, merging two lines. If there is a comment at the end of the previous line, so that you get something like:
  Fill 1/2/3 4/5/6 7/8/9 10/11/12 13:14:15 $ #comment1
  Fill 3/2/1 4/5/6 7/8/9 10/11/12 13:14:15 $ #comment2
instead of
Fill 1/2/3 4/5/6 7/8/9 10/11/12 13:14:15 $ #comment1
Fill 3/2/1 4/5/6 7/8/9 10/11/12 13:14:15 $ #comment2
then the importer will lose the second line. Go through your file to fix these by hand, or open the file in another text editor.
It goes without saying that you should only use the Importer to modify other people’s models when you have the permission of the original author.
3 Rail3D Export Plugin
3.1 Installation
From version 7.1.1.2 on, the Rail3D export plugin is included in 3DCanvas Pro by default (you need to switch on the “Trainworks” features to be able to use it). If you are using an earlier version, you can download the plugin below.
Download the plugin here:
(Link no longer available)
(Note: there is also a test version of the exporter for Canvas 7.1.1.2 that supports self-coloured vb/it structures — if you want to try this, get in touch.)
Just put the dll file in your \Amabilis\Plugins folder. 3DCanvas will find it the next time it starts and add it to the Tools-Use Plugin menu.
Note: In order to export the Rail3D model, the plugin has to create a text file. My antivirus program detects this operation as “suspicious scripting activity.” If you’re not comfortable with ignoring this warning, don’t run the plugin.
See 3D Canvas Samples for a couple of examples of models built this way.
3.2 Getting started
Start by building a simple model in 3DCanvas and exporting it to Rail3D to see what happens. A good start might be Ian Morgan’s msts tutorials (“Tool store” and “Wagon”) that can be found on the 3DCanvas Tutorials page.
3.3 What the plugin does
The plugin iterates through the groups and objects in a 3DCanvas scene and exports them into a component hierarchy in Rail3D format, generating the necessary names and Include statements automatically. To make sure that the names of components are not duplicated in your Rail3D stock index, the plugin asks you for a unique name that it adds as a prefix to all the subcomponents.
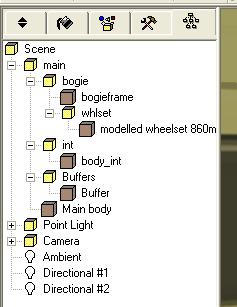
Typical object hierarchy in 3DCanvasFor instance, if you have an object tree like this in your 3DCanvas model, and you use the unique name sncf_X3800:
- you will get a top-level model called
sncf_X3800, which contains nothing but a skeleton for your header information and an Include pointing to the sncf_X3800_main component.
- the
sncf_X3800_main component will have Includes for the sncf_X3800_bogie, sncf_X3800_int and sncf_X3800_Buffers components which in turn have Includes pointing to the next level down, and the actual 3d model of the vehicle body in a single Vertex Buffer and Indexed Triangle List built from the Main Body object.
- if there are two or more sibling objects in one group, they are merged into a single Rail3D component (unless you turn off the “merge siblings” option).
- the plugin tries to place the model correctly in the Rail3D scene, i.e. with its centre on the track centreline, its lowest point at H=0, and one end at L=0. You can tweak this with the Offset settings, e.g. if your model is a loco body without wheels, the lowest point will not be at H=0, so you could change the proposed H offset.
- if it finds Groups with names including the terms “bogie” or “wheel”, it tries to generate the correct Rail3D syntax for them. You can select the “Mirror” option to create two bogies/axles for the price of one.
- the Light and Camera objects have no significance in Rail3D at the moment, and are ignored by the plugin.
- the plugin also appends a number to the component names. This avoids problems with duplicates if you forget to name your objects in 3DCanvas before exporting.
3.4 What the Plugin doesn’t do (yet…)
- Pantographs — these are fairly easy to handle with the new code, if you build the bits in the correct hierarchy, but you will have to add the Pantograph and Panarm keywords in the file yourself. Note that you should not do “normalize all groups” to a pantograph, unless you have set all the parts into their “θ = 0″ position.
- Steam loco animations — the msts plugin generates a series of animation frames, and for the moment it’s not clear to me how to translate these into Wheel and Motion commands.
- Use material settings other than the texture mapping — for the moment everything is rendered in Rail3D as default “cardboard”, the ambient, translucency and specular values are ignored.
- Allow you to export only part of the Canvas scene
3.5 Setting up your model in 3DCanvas to export cleanly
nb: If you’re using a model you built for another simulator, it might be a good idea to save a copy for use with the Rail3D exporter, and keep the original optimised for msts or whatever.
- Work in metres! I haven’t added unit conversion yet, though it should be possible if you really need it. The output from the plugin is in integer millimetres (Rail3D millimetric keyword).
- X in 3DCanvas corresponds to W in Rail3D; Y corresponds to H and Z to L. This isn’t entirely what you would expect: apparently we aren’t all using the same sign convention!
- Model repeated components once only — 3DCanvas doesn’t seem to support multiple references to the same object, so if you put four axles under your coach, you will get four identical components in your Rail3D output. Model one axle and one bogie, and use the “Mirror” option, or add the references to the others in the Rail3D editor.
- Make sure that animated components like wheels and bogies have their origins (“pivot points”) in the right place: in line with the axle for wheels, in line with the pivot for bogies. Use the “Centre selection in Group” operation to line animated components up with their groups.
- If you are using tga textures with alpha-channel transparency, put the interior (“the things you can see through the windows”) in a separate object from the transparent exterior. If possible, the interior should appear after the exterior in the tree (if this doesn’t work out, just reorder them after export).
- You can only have one texture per object. Other textures after the first are ignored.
- Where possible, put objects together in one group so that they will be merged into a single component — one vertex buffer with 200 vertices is a lot more efficient than 10 with 20 vertices each, so reduce the number of separate components in your model as far as possible before export.
- Use the “Normalize Groups” plugin to ensure that all the groups have their pivot axes lined up with the global coordinate system (but be careful about normalising if there are components you are going to animate with panarm or motion2 or 3).
- The fewer vertices the better — apply the techniques for model simplification and optimisation from the 3DCanvas tutorials before you export.
3.6 Mix and Match
You don’t have to build your model all in one go. Since the exporter creates Rail3D components, you are free to combine bits made in 3DCanvas with bits made the traditional Rail3D way in your final model.
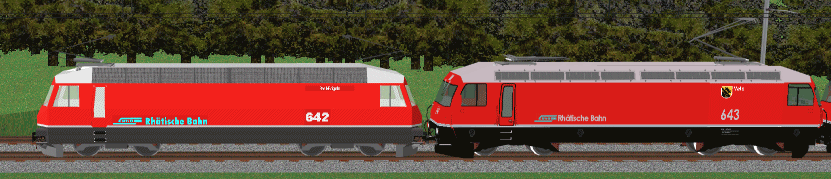
The loco on the left has a bodyshell made of Fills, the one on the right has a 3DCanvas bodyshell
3.7 Groups and Objects
A Group in 3DCanvas is not just a logical combination of bits that belong together: it also defines a local coordinate system. Objects within a 3DCanvas group all have their coordinate origin (“pivot point”) set at the origin of the group. You can see this if you look at the exported file — Includes pointing to “group” components usually have non-zero parameters; those pointing to objects are all 0/0/0.
This means that if we put a wheel or bogie in a group at the same level as other objects, it will not have its origin at the right point.
3.8 Textures
One problem in adapting the “traditional” Rail3D way of working is that 3DCanvas apparently doesn’t work properly with textures that are not square. When you’re modelling railway vehicles that often have an aspect ratio for their side panels of 10:1, a square is not an obvious format to use, and takes a bit of rethinking. It may be necessary to include a set of vertices half way along, so that you can split a coach side texture into manageable pieces. It’s a trade-off between minimising vertices and reducing texture size.
On the other hand, working in 3DCanvas gives you a lot more flexibility in texturing. In the Rail3D Editor it was very difficult to map textures onto non-rectangular faces without distortion. For each point you had to do a bit of arithmetic and a lot of trial and error. In 3DCanvas it goes a lot quicker, and you don’t have to be so careful in laying out the texture on the page: the Rh B loco bodyshell above was textured in a few minutes using coloured side and end views scanned from a book (to be replaced with a proper texture before the model is released, of course).
4 Post-processing in Rail3D
- Obviously, the first thing you will have to do after adding all those new components is to rebuild the stock index, so that Rail3D knows they are there.
- Depending on where you put the model in 3D Canvas space, you may find that the model isn’t on the track — the plugin puts the dimensions of the “bounding box” in the top of the stock file to help you work out what values you need in the top level Include statement to get the centreline on the track and the back end at L=0.
- You may need to add additional kinetic parameters beyond the basic set you make with the plugin.
- If necessary, move the Includes for interior components after those for transparent exterior components.
- Replace Include statements with Wheel and Bogie statements where appropriate, if the plugin wasn’t able to do this for you. You may also need to add references to the axles and bogies you didn’t model in 3DCanvas.
- Correct the Wheelbase statement in the bogie component.
- Make sure that your texture file is in the Rail3D search path
5 Appendix: Sample output from the plugin
Below is the first part of a file exported by the plugin, to give an idea how it looks.
Credit	All my own work
# 	Exported from 3DCanvas
# 	30 April 2006
# 	20:44:42

# 	Created using 3DCanvas Rail3D Export Plugin v.1.1.3
# 	by Mark Hodson  http://www.markhodson.nl


# 	Model bounding box coordinates in mm:
# 	W 	-1285	to 	1284
# 	L 	-9861	to 	9882
# 	H 	6	to 	3575
# 	(relative to 3DC scene origin)

# 	Model width 	2569 mm
# 	Centre W= 	-1 mm
# 	Model length 	19743 mm
# 	Centre L= 	11 mm
# 	Model height 	3569 mm

Name 	3dcExport
Description 	Model exported from 3DC
MILLIMETRIC
Gauge 	1435
Length 	19743	#from bounding box - replace with correct length in mm
Wheelbase 	11845	#Guess - replace with correct wheelbase in mm

Include 	0/0/1443	3dcExport_main_7
[end]

Name 	3dcExport_main_7
MILLIMETRIC
Component

Include 	0/-30/-1138	3dcExport_Buffers_16
Include 	0/0/0	3dcExport_int_21
Include 	0/-6219/-1428	3dcExport_bogie_26
Include 	0/0/0	3dcExport_Main body_49
[end]

Name 3dcExport_Main body_49
Component
MILLIMETRIC
Skin    "picasso_square.TGA"


	-1285/3912/-869	-1/0/100	0.217,0.614
	-1169/3912/-869	-1/0/100	0.214,0.614
	-1169/2801/-869	-1/0/100	0.214,0.581
	-1285/2801/-869	-1/0/100	0.217,0.581
	1284/2801/-869	-1/0/100	0.158,0.582
	1122/2801/-869	-1/0/100	0.162,0.582
…and so on for another 400 vertices.
MRG 23/11/2016 07:17:57